I'm travelling into a new way of working, a new country, a new language, and a new hobby which I'm passionate about. Come with me for some of the journey...

Saturday 28 June 2014

Autumn Limitations


Hello all!  I thought I wasn't going to make it for Tim's tag this month, but I'm here!

And it was all the more galling because the inspiration tag from Mr Holtz featured such a cool technique, which was great fun to play with, and will definitely become a regular part of the repertoire... but I'm happy to say it all worked out in the end!

So here's my take on the June tag.

It's not very summery, I know, but I was limited by the same thing as many of you in that the butterfly Framelits haven't arrived yet (they're on pre-order and I can't wait to play!).

So that involved some lateral thinking in what to use instead - and I ended up in Autumn (it's been happening once or twice lately).  The sentiment really turned out to be very apt!


As I say, the technique itself was great fun (I'm not going to go over it... you can get all the details so much better from Tim's own tutorial!).

I messed around with it in several variations over the course of the month, while waiting for things to dry on other stuff I was making (it's very quick too!).

Sometimes I worked in colour ways which felt very comfortable...


And sometimes I pushed the boat out a bit with my colour palettes - not very me, you'll notice, but worth a try!

I've certainly got plenty of backgrounds ready to play with thanks to Tim.


In the end, though, it came down to the decision to use the smaller stamps from the Autumn Leaves set as my images... and that meant creating another background using the Woodgrain stencil.

The colours used are mainly Rusty Hinge, Vintage Photo and Gathered Twigs throughout.

The leaves themselves follow some of the watercolouring techniques from Tim's Compendium of Curiosities III, so as I'm going to enter it over at Linda Ledbetter's for Challenge 5 too, I won't go into that either.


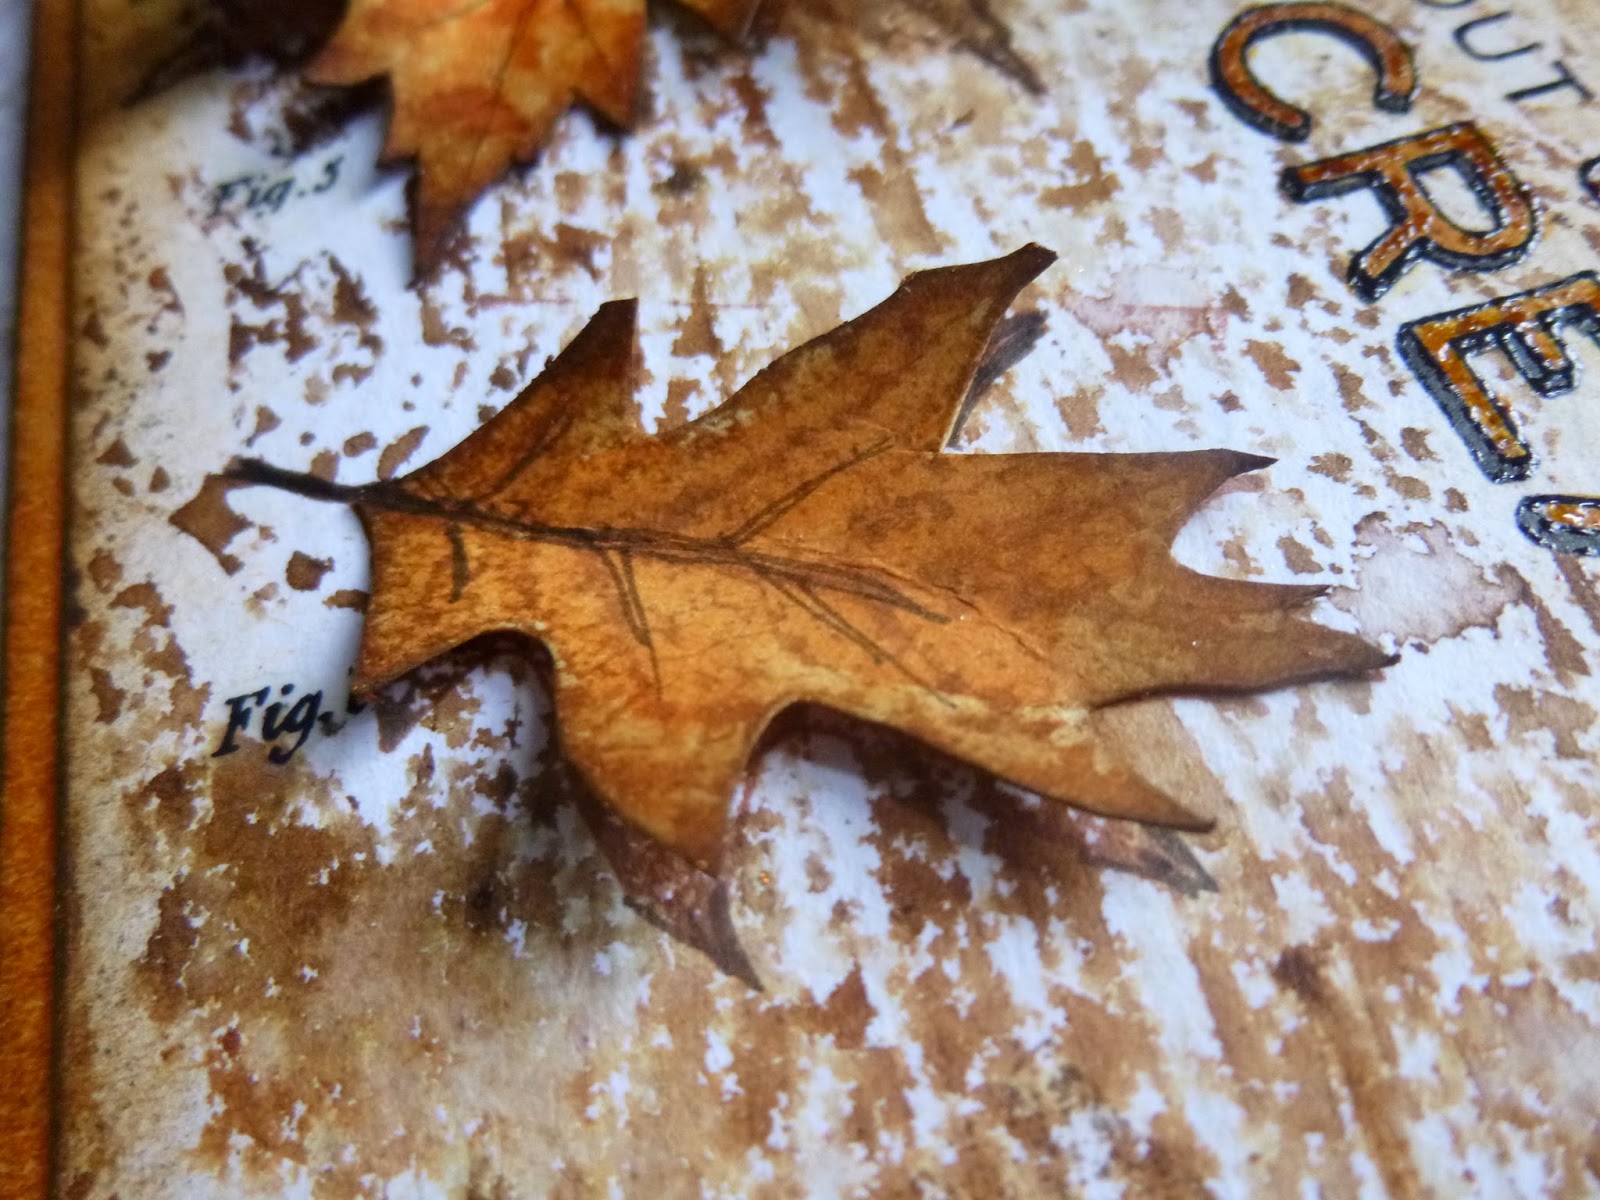
Suffice it to say, I stamped the images direct onto the background in Archival ink first, and then created my additional leaves to go over the top.


Once I'd done my watercolouring, I decided the leaf skeletons needed a little more definition again, so I used a PITT pen just to sketch in a bit more detail over the top.


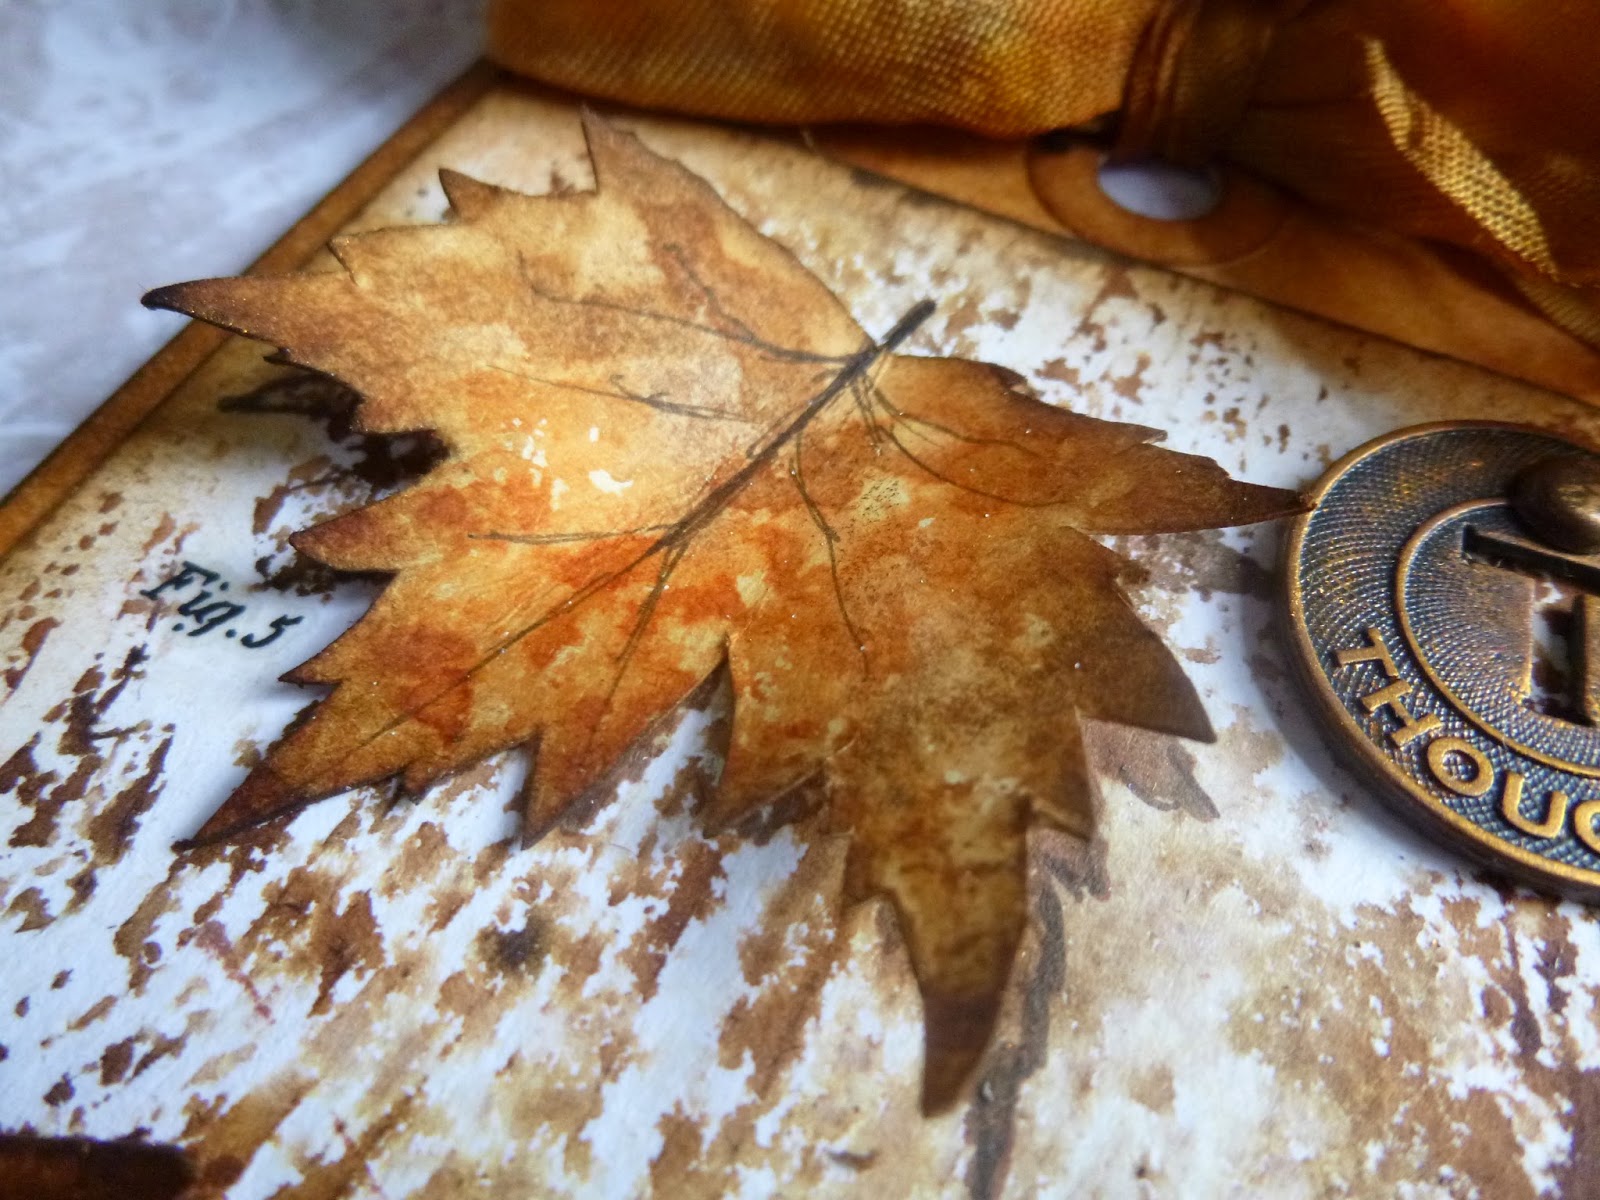
Also, I wanted to echo the botanical labelling that you get with the butterflies, so I used some Remnant Rubs to add the Figure labels beside each leaf.


I stamped the sentiment in Jet Black, but even with some clear embossing it wasn't quite holding its own against the woodgrain.

To make it pop a bit more, I coloured in the edges with a black PITT pen and the main face of the letters with Wild Honey and Rusty Hinge Distress Markers before clear embossing again.


The gloss and the texture means it pings a bit better against the background.


I added an Idea-ology Muse Token, altered with some Tarnished Brass Distress Paint and some Florentine Gold Treasure Gold.

There are also gold highlights around the leaf edges and tag edges in places too.  And I edged both the central panel and the tag in the background with Potting Soil Archival to give good definition and draw the eye inwards.


I had a lovely time making the "Paula Bow"... so simple and yet so effective.  There's nothing like a bit (or a lot!) of dyed crinkle ribbon to finish off a tag.


So thank you for another fabulous piece of inspiration this month, Tim - this is a technique which will definitely be featuring again.  Quite apart from anything else, I've got all those other variations to use up!!

Thanks so much for stopping by.  I'm in the usual end-of-month chaos, so forgive me for being somewhat slack on the visiting.  

I always seem to be on catch up at the moment, but I'm really looking forward to spending some time finding out what you've all been up to lately.

Have a lovely weekend all!

Never say there is nothing beautiful in the world any more.  There is always something to make you wonder in the shape of a tree, the trembling of a leaf.
Albert Schweitzer


I'd like to enter this as my June tag in Tim Holtz's 12 Tags of 2014, and also in Challenge 5 of the Compendium of Curiosities III Challenges hosted by the fabulous Linda Ledbetter.

Friday 27 June 2014

Urban Tapestry


Hello all!  Thank goodness Blogger Dashboard seems to be back in action.  I've mostly been relying on going to old posts and repaying visits to commenters there, and haven't had much spare time either - so apologies if you're feeling neglected!  I hope to do some more catching up soon.

On to happier things...  It's time for a new challenge at A Vintage Journey, hosted this time by the lovely Nikki of Addicted to Art.  She'd like you to Use Every Stamp In A Set.  As always, there's tons of great inspiration from my brilliant team-mates, and do make sure you check out Nikki's challenge guidelines carefully as well as our Travelling Instructions to be in with a chance at the prize, generously sponsored by Country View Crafts.


Okay, enough with the crazy links... on to my inspiration offering.  Guess what... it's a tag!


I loved the challenge of using all the stamps in a set, and decided this was a great invitation to return to my first love, simply stamping.  (If you saw my Simple Cards over at Artistic Stamper, you'll know that I've already been up to some of that!)

This is not quite as simple - I couldn't resist some glossy embossing! - but it's pretty close!


I was caught up in enjoying myself, so there aren't many process photos today (I did mean to do one of the background before I stuck the sentiment on - it had a lovely pale glow at the centre - but there you go), but then it's all pretty self-explanatory so who needs'em?!

I used Tim's Urban Tapestry set, by Stampers Anonymous.


I couldn't resist the lure of the wonderful tangle of meadow flowers and grasses, which I stamped several times around the foot of the tag and straggling up the sides.


They're stamped in Potting Soil Archival Ink, and in and around them I also used the little texture stamp, in Sepia, to add more pollen and flower heads and depth.


The bird on a branch is also stamped in Potting Soil, then clear embossed, and then I reheated the embossing and sprinkled on just a touch of copper embossing powder which melted into the clear stuff.

Of course a few grains went elsewhere, but that was fine by me - an imperfection I'm more than happy to embrace.


I did the same process at the foot of the tag with the architectural corner flourish - clear embossing, and then reheating that as I sprinkled copper embossing powder over parts of it.


Again, you get some extra shimmer escaping into the depths of the grassy tangles.


I inked up the tag, using a mask over the body of the bird (no need to mask the rest of him - the embossing resist takes care of that), building up layers of colour.

From the bottom we've got Gathered Twigs, Vintage Photo and Rusty Hinge.


And from the top we've got Faded Jeans, Stormy Sky and Broken China.  

I also stamped the texture stamp, this time in Faded Jeans, to get that lazy hazy look of a summer sky.


The sentiment takes centre stage, stamped on watercolour paper in Potting Soil Archival, and then stamped again on kraft card so that I could cut out certain words to highlight them.


Those words are mounted on padded tape to make them pop even a little more.


The texture stamp is in action again on the Idea-ology Crinkle Ribbons, stamped in Sepia Archival...


... before I dyed them with some Faded Jeans and added some extra inking in Gathered Twigs for a grungier look.


If that hasn't got you in the mood yet, then do hop over and see all the fabulous projects being offered up by my team-mates over at A Vintage Journey.


We hope you'll join us with your projects where you Use Every Stamp In A Set some time in the next fortnight.  Thanks so much for stopping by!

Now is the time to enliven, ennoble and enrich your life's tapestry.
Ifeanyi Enoch Onuoha

Oh, and don't forget there are just a couple of days left if you want to sign up for a chance to win my Butterfly Blogaversary Candy - it closes at midnight (BST) on 30th June.

Tuesday 24 June 2014

Simple Cards...

Simple?  Cards??  Can this possibly be Words and Pictures?!

Yes, I know... it's very strange altogether.  If you don't believe me, you're just going to have to hop over to The Artistic Stamper Creative Team Blog to see them with your own eyes.


Clearly the celebrations have caused me to have a funny turn - too much Butterfly Blogaversary Candy, that's the trouble.  (Do make sure you leave a comment on the candy post if you'd like to be in with a chance to win.)

Hope you like what you find when you get to The Artistic Stamper - I think it's still recognisably "me"!  Happy Crafting all!

The more simple we are, the more complete we become.
Auguste Rodin

Saturday 21 June 2014

Autumn at Calico

"Autumn?!" I hear you cry...  Yes, I know, sorry.  I got a little carried away with the Calico Craft Parts new leaves, and ended up with a rather unseasonal offering.  I hope that won't stop you hopping over to Calico Crafts to see what I've been up to - I rather like this one, so I'd love to know what you make of it.


I'm sorry that it's another long post too... I promise there's a shorter one coming next!!

Oh, and we're celebrating here at Words and Pictures, so if you'd like a chance to win my Butterfly Blogaversary Candy, make sure you leave a comment there...  Hope you enjoy yourself with my autumn leaves over at Calico Crafts.

Let your life lightly dance on the edges of Time like dew on the tip of a leaf.
Rabindranath Tagore

UPDATE - As you may well know, Calico Crafts has been reinvented as Calico Craft Parts, so the old blog is no longer available.  I've removed the old links, and you can now see the whole of this project here.


Thursday 19 June 2014

Butterfly Blogaversary Candy


This is a sticky post until midnight BST, 30th June.  Normal crafty service continues below!

Hello all!  Yes, unbelievably it's my 2nd anniversary here at Words and Pictures.  And, although we've been taking a dollshouse detour this week, I still wanted to celebrate.  (Would love you to check out the Tudor Tavern, the Opera Singer's House and the Dollshouse Gallimaufry if you haven't already seen them.  Or if you're new here, you'll get an idea of some of the more normal crafty stuff here.)


I feel so lucky to share in all the generosity and creativity of Craftyblogland.  Your comments and feedback are a constant source of joy, and the inspiration I find from travelling from blog to blog is immeasurable.  I only wish I could give candy out to every single one of you to thank you for your company on this amazing journey!

But no, my thanks and love go to all of you, but the candy can only go to one... so please simply leave a comment here if you would like to be included in the draw.  This sticky post will stay at the top of the blog until the end of June, when I'll pick the winner out of a hat.

It's NOT compulsory to join up as a Follower - though if you like the work you see here, then it would be lovely if you did (would be so thrilled to hit 500!) - and while it would be great if you shared the candy photo and link on your blog or sidebar, that's not compulsory either.

Thank you so much for everything and good luck!


Every day is a birthday; every moment of it is new to us; we are born again, renewed for fresh work and endeavour.
Isaac Watts

Wednesday 18 June 2014

Dollshouse Gallimaufry


Gallimaufry - a confused jumble or medley of things, a hodgepodge

And that really is what I have for you today in this last of the trio of dollshouse posts, sharing the work I did in Small Worlds over the course of five weeks in the Czech Republic.  I think there were just three days in the whole five weeks that I didn't go in to the museum (and one of those was spent working on Susanne's furniture back at the house).

 Alongside the major overhauls of the Tudor Tavern and the Opera Singer's House, I worked on various bits and pieces for other houses, inside and out... Some of it was carrying on with work that didn't get done last year, some of it for projects Cestina was working on - deploying my stash of paints, mediums, inks, papers and dies in whatever direction was necessary.

So I hope you enjoy the gallimaufry!


Let's start in America, with the Cape Cod house.  

This was one of last year's major overhauls (you can see it here in another gallimaufry, if you missed it), but some things were left undone.

Now the exterior is pretty much done, look!


The main thing on the outside was that I didn't manage to get round to replacing the windows.

As the eyes are the window to the soul, so a house without windows often looks a little lost and forlorn.

A little work with some fine squared dowelling, white paint and delicate glue work soon sorted that out.

And you'll notice the house now has a front door step too, making entry a little easier!


I decided to create my windows without any actual "glass" (it would've been acetate really).  I think it looks fine from a distance with just the wood, and it means the opportunities for peeking in are much improved.


It's one of my favourite things to do with dollshouses... looking in through the windows, catching a different angle on things.  In this second peek, you can catch a glimpse of one of the other home improvements from this year.


Last year my aunt, Mette Breminer - a very experienced miniaturist who writes for Dolls House and Miniature Scene magazine - came and did lots of wonderful fine fabric work for the houses - bed linen, cushions and so forth.

(Neither Cestina nor I get on well with fabric.)


Mette made all the beautiful bedding in this house and the lovely blue cushions in the living room but, as she had only a few days in CZ, she took the curtain fabric away to make those at home.

This year, I had the relatively easy job of putting up her beautiful curtains... the lovely blue ones in both of the bedrooms...


Elegant cream ones in the dining room...


And the same in the large open living area where there are lots of windows.  

The ones at the far end are at full arms' reach, so it was another stick-it-and-hope affair.  I couldn't actually see what I was doing once I had both arms in there, so it was all by feel!


But the major drawback for the inhabitants of this house for the last year has been the lack of a bathroom!  

As you can see from this photo from last May, I decorated the room, but there were no suitable bathroom suites amongst the stash without quite a lot of work, and there just wasn't time for that then.


Time for a scrabble through the accumulated hoard of 40 years or more... to come up with this very unpromising selection.

In the end it wasn't this bath that I used, but a ceramic one with rather sickly violets all over it... forgot to get a "before" of that, I'm afraid.


It takes quite a lot of work to get good coverage over plastic.  

After a couple of coats of gesso, I used DecoArt's Chalk Paint in Serenity, and gave that a coat of varnish to try to get a ceramic look. 


And I hope you'll understand why I'm pretty proud of the end result!


The large shower head (it's a memory I treasure from our house exchange holiday in 1980 - the amazing showers in the States!) is made from the internal filter from a full size tap.  (Anyone who's had to replace one will recognise it!)


The taps and pipes were mostly salvaged from leftovers from bathroom kits already in use elsewhere.

All the brass fixtures are painted in a mixture of DecoArt Worn Penny and Ten Seconds Studio Verday Brass so that they all match.


Some of the plumbing is just the bits of plastic from between the bits you're meant to use out of the kit!

And I remembered to add a handle to flush the loo...


There's obviously still loads to be added in this house in terms of the soft bits of living - where are the books?  The magazines?  The ornaments?  The kitchen's in pretty good nick (but I don't seem to have taken a photo of that), but the rest of the house needs more.  But I did get around to hanging up a few posters.


Clearly the inhabitants are regular visitors to the Metropolitan Museum of Art in New York.  (All these were cut from one of their catalogues, and mounted behind clear acetate to replicate those big glass frames you get.)  If you spotted the bedroom wallpaper, you'll see why it had to be an iris in the bathroom!


A quick dip into some altered furniture now - for the bedsits in the Finchley Road house.  I completely revamped the exterior of this house last year, and Cestina will be sharing her work on the interior very soon over on her blog.  So I'll leave her to explain whose furniture this is.


(The yellow tea set from the last post belongs to the same person!)


Suffice it to say I had lots of fun with the DecoArt Chalk Paints again - they're just as good for shabby chic miniature furniture as they are for the full-size stuff.  (Click on the photos for a full-size view!)


These have been done with a combination of two greens, Vintage and Enchanted, with a touch of Everlasting for extra shabbiness.  I think they look better now!


In addition to the Cape Cod windows, there was some more window work required of me this year.  This is for a house that's still a work in progress... hopefully Cestina will be making some of that progress over the summer (in between showing visitors around the museum).

It's a large Triang house, which is to become a village tearoom and post-office.  At the moment, we're still tackling the exterior.


We're modelling it after this rather beautiful house, found on a Google search... and my main task for it this time around was to create the leaded windows.

Cestina was in charge of making the "oak" window frames, and I cut some acetate sheeting to size.  


I used a dimensional pearl pen and, having drawn a grid on paper, proceeded to painstakingly lattice my way across all the acetate.  Had to do it in one direction first and let that dry...


 ... and then finish off in the other direction.


They had to sit safely out of the way until they were set... I wasn't doing any blinking extras - stressful task, trying to keep those lines straight, and irritatingly hard to achieve perfection!


Then it was my job to assemble the frames and windows and glue them all in place (Cestina doesn't like using the hot glue gun.)   In the end though, it was worth it for the effect I think.  Even though they're not perfect...


There are embossed panels (run through the BigShot) and some wood carvings to create the effect of the pargeting, which I think works quite well.


The beautiful bay window is not yet attached, and Cestina has the inside to tackle - but I think in the long run it's going to look pretty good.


Here's another window (ish) task completed for one of Cestina's projects.  She'd made some shutters for the house she was working on (out of very fine corrugated cardboard - no surprise to the regulars that that was my suggestion! - and strips of fine wood), and she wanted a weathered coppery effect for them.


I started out with a similar method to that used on the roof of the Opera Singer's House - painting the shutters with teals and greens, and then dry-brushing DecoArt Worn Penny over the top.


But it wasn't quite weathered enough, so I decided to dip into the magical Ten Seconds Studio Verday paint!

It really is amazing stuff.  It comes in Iron, Brass, Bronze and Copper, and with a Patina solution for altering them.


This is obviously the Copper.  

You put on one coat (giving you a fabulous brand new copper look - sorry, no photos of that); let it dry for at least an hour; then apply a second coat and while that is still wet you spray it with the Patina solution and leave it to work.


One really cool thing is that the second coat doesn't have to be of the same metal.  This is copper + copper, but you could do copper and then bronze as the second coat, or iron + brass - meaning you have endless decaying possibilities.

(If you remember the ancient shields in one of the Tudor bedrooms, they had lots of different layers as I just played and experimented!)


And here they are in situ on the house.


I'm also responsible for all those vines clambering over the walls (again, Cestina and the hot glue gun, not a good mix)...

... as well as for the lintel over the door - created to match the ones already in place over the windows - and the sponging around the bottom of the house, just breaking up that bland cream a bit.


(Oh - and I trained some ivy up the wall of the old thatched house while I was at it too!)


You can find out more about the inspiration for this "old house in Paris that was covered with vines" (I'll be impressed if you know that one... and if you do, you'll have just a hint of what's inside!), as well as seeing the fabulous transformation of the interior over at Cestina's Dollshouses very soon.


In the background of the photo above you can catch a glimpse of one of last year's major overhauls - the Colonial Bungalow.


For the full transformation, you'll need to go back to last year's post, but you may remember that our poor young chap had left England to take up a diplomatic posting after a broken engagement (whether in Africa or India was still subject to some debate between me and Cestina... me for Africa (under the influence of Out of Africa), her for India (under the influence of Kipling)).


It turns out (as the story developed this year) that he wasn't spurned by his love after all, but rather that her father put an end to the connection before it ever got as far as them being engaged, disapproving of the young man's antecedents, and doubtful of his ever making anything of himself.


So our young bachelor is out to prove his worth by making a success of his first posting for the Foreign Office.  

Last year he was still awaiting the shipment of some of his belongings, but the place is looking a little more lived in now.

Here in the office, for instance, where he meets with local officials and dignitaries, he now has some maps up on the wall. 


I made the frames out of tiny strips of wood, and the maps themselves are cut from a dollshouse magazine.

(I'm not quite sure what use a map of Hampshire is to him out here in the heat of Africa (India?), but there you go.)


I painted my frames black so that they would match these family photographs, also now arrived from England.

(In fact, they were liberated from the Playmobil dollshouse owned by my niece.  It's okay, she still has some - there were plenty to go around).


They're clearly keeping him busy.  Lots of letters are awaiting his attention on the portable writing desk - so useful when he has to make visits to outlying towns and villages. 

(I didn't make the writing desk, but I did write the letters!)


He must have been relieved that his collection of prints and engravings survived the voyage without damage.  


They now adorn the walls of the drawing room.

(More handmade frames, and dollshouse magazine cut-outs.)


In the end, it was simplest to stick the pictures onto card, and then stick the frames around them, and then cut the whole lot out.


You'll notice a proud new acquisition over the fireplace too... our young man hasn't been idle in his leisure time here.  

(The elephant head was picked up by Cestina in a charity shop for a matter of pennies... I think it may have been mounted on a pencil sharpener or some such thing.  It just needed some sawing and a bit of gilding on the shield to render it fit for display.)


And, most precious of all the arrivals from England, some photographs of his loved one.

There's one in the hall...


... and then another on the new piece of furniture in his bedroom (shipped out in the same container).

These are framed with the same delicate strips of wood, painted black.


This cabinet, incidentally, started out exactly the same as the shabby, chalky green one above (they're available at The Range).

This time the plain wood finish has been turned to walnut, with gilded handles.

I chopped the legs off, as otherwise it was too tall for the splendid mirror which was actually the thing we really wanted to add to the bedroom!


(Obsessive) Idea-ology fans may have spotted that the glass in the photo frames is actually made from some of the Idea-ology packaging... perfect for the purpose.  

The silver fox in the Opera Singer's House is also housed in one of these little rectangles, and then framed.


Oh, and there's a letter from her too - saying that they've been hearing great things about his progress, and that she's sure her father will soon relent when he sees the true worth of the fine young man she's set her heart on.


I found that there had been some shenanigans going on in the kitchen since I was last here...

There's a dangerous intruder - being very ineffectively dealt with by the resident mongoose - Rikki Tikki Tavi, anyone?  

Okay, so Cestina reckons that, because Kipling's story is set in India, this means we're definitely in India.  But (a) she freely admits that this is a meerkat, not a mongoose; (b) there are mongooses (mongeese?) in Africa; and moreover (c) the meerkat is a sort of mongoose and they live only in Africa.

So I'm afraid Cestina is hoist with her own petard (she put the snake and the meerkat in the kitchen to start with).  We are in Africa, and I win!!


I'll leave you with just a little taster of delights to come at Small Worlds... another work in progress - our 1920(ish) department store.

Cestina was working like a demon on papering and flooring, as well as constructing the shop windows from scratch - I'll leave her to tell you how much swearing they incurred!


Her challenge to me was to create a glamorous lift to run through the centre of the store.  She had these ones from the original Selfridge's fit-out in mind (they're now in the Museum of London).

Jeepers!  All that opulent gilding is really not my bag, but I grudgingly agreed to give it a go.


The lift shaft was being cut to accommodate a fairly unassuming wooden box that was hanging around.  So with the help of some gold mirror card, black enamel paint, some stickers, plenty of Treasure Gold Liquid Leaf in Florentine and, yes, some Frameworks die-cuts, this is what I did to that wooden box!


Rather than those gilded doors, ours is a somewhat less grand affair, with those black cage doors that concertina open and closed.

The Frameworks were cut from thick card and given a good coat of black enamel paint, as was the outside of the box.


It's definitely opulent on the inside though...

Even the buttons you push to go up and down are mirror plated.

They're made from some tiny mirror gems, stuck onto some gilded cardboard, mounted on black enamel-painted card.


Of course, we needed a lift cage, so I spent some time snipping away at garden chicken wire to cut it to size, and then persuading it into shape.


To convert it from dull chicken wire, it's had a good coat of Florentine Liquid Leaf too.  And I painted some twisted wire braid with dark burgundy nail polish to create the velvet swag ropes which will - I hope - prevent customers from plunging down the lift shaft!


It's actually three separate cages, one on each floor, but I think the illusion of a continuous lift shaft works pretty well.


Downstairs, you'll see that the fitting out of the shop has already begun.  There are many mirrors, to create lots of light and glamour.


Yup - the Tim Holtz Cabinet Card die has been in action, and I've also been re-gilding lots of other mirrors, plastic and metal, so that they all have a similar finish.


I didn't think we were going to get much done on this one... but as a result of a great deal of lightning-speed effort in the last few days in CZ, it's now mainly a matter of the fun stuff - filling it and bringing it to life.

There will be more shelves and cabinets, filled with stock, and all those glass cases collected over decades will eventually be filled with enticing goods for purchase.


But I think you can get a good idea of where it's headed... Keep an eye on developments over at Cestina's Dollshouses to see how it all turns out!

UPDATE - Visit Gosthwaites of Aberystwyth now at Cestina's Dollshouses, Part 1 and Part 2.

Thank you so much for your lovely feedback on this dollshouse detour.  I've had fun sharing how I've been deploying my crafting skills and products in a different context.  I hope you've enjoyed this final gallimaufry.  You can see why I said it wouldn't all fit in one post!!
  
We'll be back to regular crafty activities this weekend, but there's a big celebration to come first here at Words and Pictures... keep your eyes peeled!

So now they have made our English tongue a gallimaufry or hodgepodge of all other speeches.
Edmund Spenser